Pages

Monday, December 27, 2010

Pasta á la Christy


My good friend Christy may not love to cook, actually, I think she rather detests the chore! But she has really good taste, something you can tell just by looking at her! Impeccable fashion sense in home décor and clothing, great wine and of course, food! So it didn't really surprise me when she listed off some ingredients she has combined together in her own little pasta creation. She didn't have exact amounts for me to follow, so I was left to my own devices to figure it out. What I came up with was quite tasty, however, without Christy's input on the final product (other than the photo I sent her), I don't know if it is quite up to par with her standards. At any rate, I think you should try it...and of course, make any adjustments to suit your tastes -- but as a guide, here's what I did:


8 oz angel hair pasta, cooked as directed on package
~~~~~
1-2 TBSP olive oil
-- heat in large sauté pan, and then add:
2 chicken breasts, diced
Salt and pepper to taste
-- Sauté over medium heat until chicken is no longer pink, then add:
½ cup pitted kalamata olives, halved
2 TBSP capers
4 cloves garlic, diced
4 TBSP fresh basil leaves, diced (reserve 1 TBSP for garnish)
3 roma tomatoes, diced
-- let simmer together for 5-7 minutes. Pour chicken mixture over cooked angel hair pasta, and toss with several tablespoons freshly grated parmesan cheese. Top each serving with additional parmesan and reserved fresh chopped basil. Now grab a glass of your favorite white wine (or red, rules can be broken!) and ENJOY!


Monday, December 20, 2010

Beignets (little fried doughnuts)


Beignets (fancy French word for fried doughnuts....now don't you feel more virtuous using that word instead???)

I don’t know about you, but I love cooking and baking sweets for the holidays! So, I decided to go out on a limb and try something I have never made before, but see quite often in cooking competitions like “Chopped” on The Food Network….Beignets. It’s a French term for fried doughnuts. Only, not the doughnuts we are used to getting at the bakery here in the U.S., but a slightly less rich and less sweet fried pastry. Now, typically these beignets are simply dredged in plain old powdered sugar after being deep fried, but again, I decided to try something a little different with my toppings. Here’s what I did:


Topping #1 – Sweet Chai (favorite!)
1 cup powdered sugar
2 tea bags Vanilla Chai tea, opened
     (I got this idea for the tea from my friend Bre Whitley - from a cookie recipe she sent me last year!)

Topping #2 – Orange Cinnamon
1 cup granulated sugar
1 ½ tsp orange zest
½ tsp cinnamon

Topping #3 – Chocolate Mint
1 cup hot chocolate mix
2 peppermint candy canes, ground to a fine powder

So – now that you know how I gave my beignets flavor, this is how you make the dough. This makes an AWFUL lot, so if you can, I would recommend halving the recipe. They are not sweet at all (if you try them plain) so if you prefer sweeter, I’d add a little more sugar (maybe another ½ cup if making the full recipe). Alternately, if you like the orange zest topping, I would even suggest adding the orange zest to the dough (along with the flour) and then just using cinnamon and sugar to coat. At any rate…these are really yummy, and I suggest you try to make them at least ONCE in your life! Especially if you’re a doughnut lover!

Ingredients (recipe taken from The Food Network, via Paula Deen)
http://www.foodnetwork.com/recipes/paula-deen/french-quarter-beignets-recipe/index.html

• 1 1/2 cups lukewarm water
• 1/2 cup granulated sugar
• 1 envelope active dry yeast
• 2 eggs, slightly beaten
• 1 1/4 teaspoons salt
• 1 cup evaporated milk
• 7 cups bread flour
• 1/4 cup shortening
• Nonstick spray
• Oil, for deep-frying
• 3 cups confectioners' sugar

Directions

Mix water, sugar, and yeast in a large bowl and let sit for 10 minutes.
In another bowl, beat the eggs, salt and evaporated milk together. Mix egg mixture to the yeast mixture. In a separate bowl, measure out the bread flour. Add 3 cups of the flour to the yeast mixture and stir to combine. Add the shortening and continue to stir while adding the remaining flour. Remove dough from the bowl, place onto a lightly floured surface and knead until smooth. Spray a large bowl with nonstick spray. Put dough into the bowl and cover with plastic wrap or a towel. Let rise in a warm place for at least 2 hours. (you can also cover in plastic and refrigerate for up to 24 hours if you need to)

Preheat oil in a deep-fryer to 350 degrees F.

Add the confectioners' sugar to a paper or plastic bag and set aside.
Roll the dough out to about 1/4-inch thickness and cut into 1-inch squares. Deep-fry, flipping constantly, until they become a golden color. After beignets are fried, drain them for a few seconds on paper towels, and then toss them into the bag of confectioners' sugar. Hold bag closed and shake to coat evenly.

ENJOY!!


Monday, December 13, 2010

Black Velvet Cake (Whiskey Cake)


Black Velvet Cake
So this is the simplest cake recipe ever! And the most decadent and sinful, guaranteed to get you tons of compliments, and requests to make it for any potluck style function you attend. You can even cheat on parts of it. But the cake itself HAS to be the one from the back of the Hershey's Unsweetened Cocoa Powder container. Here it is though, I know it by heart, been using the same recipe since I was 10!

1 3/4 cup flour
2 cups sugar
3/4 cup unsweetened cocoa powder (sifted)
1 1/2 tsp baking powder
1 1/2 tsp baking soda
1 tsp salt

Mix dry ingredients in large bowl, then add:

2 eggs
1/2 cup vegetable oil
1 cup milk
2 tsp vanilla extract

Beat well, until smooth. Then slowly pour in 1 cup boiling water and again, mix well.

Pour into greased and floured baking dish...either 9x13" pan, or 2 - 8 or 9" rounds. Bake at 350, approximately 30-40 minutes. I usually just watch it at the end, and once it no longer jiggles at all, and is firm to the touch, I call it good and remove from the oven. Cool for at least 4 hours before assembling.

Whipped Cream (here's where you can cheat):

2 cups heavy whipping cream
1/2 tsp salt
1 tsp vanilla (or any flavor you want...brandy extract is yummy too)
1/4 cup sugar (or more if you like sweeter)

whip the way you normally would to make whipped cream, and to make this set better, I usually dissolve 1/2 packet of Knox gelatin (about 2 tsp in 2 TBSP water) and add at the end of whipping. It holds up better under the top layer.

~OR~ just use Cool Whip!

Whiskey Sauce:

(this recipe makes more than you'll need, but trust me, you'll want leftovers to put on ice cream, french toast, cinnamon rolls...ANYTHING!)

1 cup butter (margarine will do too)
2 cups sugar
4 beaten egg yolks
1/3 cup water
1/2 cup (I usually use 3/4, sometimes even 1 whole cup) whiskey
(you can use cheap stuff, nobody will notice, and I've used amaretto, frangelico, and grand marnier too...ALL are yummy!)

In saucepan, melt butter. Stir in sugar, egg yolk, and water. Cook and stir constantly over medium heat for 8-10 minutes, or until sugar dissolves and mixture boils. Remove from heat and stir in whiskey. Cool at room temperature at least 4 hours before assembling cake.

NOW....place your bottom layer on your serving plate. Spoon some of the whiskey sauce on top of bottom layer and let it sink in. Then, use your whipped cream and spread a thick layer, making sure it goes all the way to the edge. Then place top layer on. Spoon more sauce over that to make a nice sticky base for nuts to hold on to. Either use Pecan halves, or chopped walnuts and completely cover the top with nuts. Then slowly spoon sauce over the entire top, letting it drip down sides. Refrigerate for a few hours, until sauce is hardened. Drizzle more over that if you wish. I shouldn't need to tell you what to do next....eat it and ENJOY!


Monday, December 6, 2010

Curried Chicken and Lentil Stew with Bacon


I didn't discover how delicious curry was until just a few years ago, and ever since then, I have been trying to figure out ways to make it. This recipe, so far, is my favorite way to showcase the flavor. So today I will share with you how I make this yummy stew, and hopefully you'll make a big pot of it and dig into it for the next week...OR keep some in your freezer to eat when you don't feel like cooking! And today I even had the help of my 5 year old son Timothy while making this hearty stew, so enjoy his bright smile and entertaining commentary!
Curried Chicken and Lentil Stew with Bacon

8 oz, uncooked bacon, diced
1 lb. uncooked chicken breast, diced
1 medium onion, diced (I used sweet Vidalia)
3 medium carrots, diced
3 stalks celery, diced
1 lb bag lentils
1 -- 28 oz can diced tomatoes
7 cups chicken broth (use water and bouillon cubes if needed)
2 TBSP curry powder (I use a blend of mild and hot)
2 TBSP minced garlic
½ tsp black pepper
Salt to taste, if needed at the end of cooking

In a large stock pot, render down the bacon pieces until lightly crisp. Add chicken and cook until no longer pink. Add the mirepoix (onion, carrots, and celery) to the pot, and continue to cook until tender, about 5-7 minutes. Add remaining ingredients, and stir well. Bring to a boil, cover, and then reduce heat to simmer for 45-60 minutes, or until lentils are tender. Serve warm over rice or with a side of Naan bread. I made a "Naan style" flat bread, but I grilled mine, as I do not have a tandoor!

Naan style flatbread:

2 ½ cups flour
½ teaspoon baking soda
½ teaspoon baking powder
½ cup milk
½ cup yogurt
1 tablespoon oil
1 beaten egg
1 teaspoon sugar
Add optional spices if you want, such as cumin, or garlic

Mix together dry ingredients. Heat oil in a small saucepan. Add milk, egg and yogurt to pan and heat until just warm, about 3-5 minutes. Add wet ingredients to dry ingredients and mix the dough, and knead just until held together. Let rest, covered up to 45 minutes. On floured surface divide dough into equal sized balls, 6-10 of them depending on how big you want your bread. Flatten each ball to about ½ inch thick. On a lightly grease grill pan, place as many as will fit, and grill over medium heat for about 2-3 minutes, and then turn over and brush with olive oil or butter. Cook another minute or two until done (reminded me of making pancakes). Keep warm in a covered basket or low oven until ready to eat. ENJOY! 

Monday, November 29, 2010

Orange Cranberry Granola Bars


I made this little recipe up several years ago after I had my second son. I was pretty tied up catering to my newborn's every need, and didn't have time to make myself a proper meal while my husband was at work. So I took a few of my favorite "superfoods" and incorporated them into a single granola bar that could be easily changed up for whatever my food fixation was for that week. This particular recipe was geared towards popular holiday flavors by using orange and cranberry. But some of my favorites to date have been with dried apple and butterscotch chips, dried apricot (or dried cherry) and dark chocolate, coconut and dried pineapple, and old fashioned raisin. Of course, there is no end in sight for the variations YOU can come up with...this recipe easily allows for that! So let's get started:


Basic granola bar recipe:

3 cups old fashioned rolled oats
3 cups coarsely chopped walnuts (or use a mix of walnuts, pecans, or almonds)
1 cup ground flaxseed
1 1/2 cups vanilla whey protein powder
1/2 tsp salt
1 TBSP cinnamon (optional depending on flavor profile)
1 cup dried fruit (snipped to small pieces if needed)
~~~mix well in bowl, then add:
4 eggs (or 1 cup egg whites)
1/2 - 3/4 cup honey ( I used 16 oz orange marmalade in this variation today)
1/2 cup vegetable oil

Optional add ins include -
1 cup baking chips, any flavor
1 cup yogurt covered raisins
1 cup chopped yogurt covered pretzel pieces
1 cup flaked coconut
*replace honey with molasses or maple syrup to change the flavor profile
**to make a less hearty, lighter bar - replace 1/2 the nuts with crispy rice cereal

Using your hands, mix the ingredients together in a large boil until combined thoroughly. In a greased 9x13" pan, press the mixture FIRMLY until even. Bake at 350 degrees for 20 minutes...just until the edges are lightly browned. Once done, remove from oven and cut into bars within 5 minutes. Let cool completely before attempting to remove from pan (otherwise they may fall apart). Store wrapped individually in refrigerator, or freezer for longer than one week. ENJOY!!


Monday, November 22, 2010


Turkey Chili and Pumpkin Cornbread


If you’re like me, then you probably have a lot of leftovers after the Thanksgiving holiday. Unless you love eating turkey sandwiches for a week straight, here’s something I threw together to use up those leftovers and enjoy watching football (and drinking beer) while you’re at it! And PUMPKIN! Wow…great way to sneak in some vegetables and feed your family healthy food without them even realizing it. TRY this, you’ll love it!

Pumpkin Cornbread:

½ cup butter or margarine, melted
½ cup oil
4 eggs
1 cup pumpkin puree
12 oz beer (I used Mexican beer)
1 cup sugar
~~~mix well, and then add:
1 cup cornmeal
3 cups flour
2 TBSP baking powder
1 tsp salt

Mix well, and then pour into a greased 9x13” pan. Bake at 350 degrees for 30-35 minutes, until done.

Turkey Chili:

In a 4 quart stock pot, add:
1-2 TBSP olive oil
1 yellow onion, chopped
4 garlic cloves, minced
~~~Heat on medium high and cook until translucent and tender. Add:
3 crumbled chicken bouillon cubes
1 lb dry black beans, cooked (or 3-4 cups of any beans you like)
4 cups cooked and diced turkey
1 cup pumpkin puree
1 -16 oz jar medium salsa (or use a 15 oz can diced tomato, and just double seasoning below)
1 -15 oz can sweet corn
1 -12 oz beer (again, I used Mexican beer)
2 tsp ground cumin
1 tsp chili powder
½ tsp ground oregano
Salt and pepper to taste (I didn’t need any!)

Let ingredients come to a boil, and then simmer for 20-30 minutes. Serve with warm cornbread, grab a beer (I did), get comfy in front of the football game, and ENJOY!!


Monday, November 15, 2010

Pumpkin Muffin Tops


Pumpkin Muffin Tops

I made this up a few weeks ago, because I needed something healthy and easy to eat while at school. I used the ingredients I usually keep on hand, and the first batch I made was with mashed bananas. I really like those. I do think you can substitute the banana with ANY mashed fruit really...and after making this batch with pureed pumpkin, I think I should have added a ½ cup of honey (or molasses, or maple syrup!) simply because the pumpkin doesn't have the same sweetness that bananas do. They were still good, just not as sweet and moist. So if you use pumpkin, that is my recommendation! AND, don't forget, you can just put this batter straight into muffin tins if you don't want to mess with tradition. You may need to cook it a few minutes longer if you choose to do that though, so just be aware of any adjustments you'll need to get a perfect result.

3 cups pureed pumpkin (or banana, applesauce, or other pureed fruit like peaches)
6 egg whites
1 tsp maple extract
2 cups old fashioned oats, ground down in food processor
2 cups old fashioned oats, as is (yes, 4 cups total)
1 cup ground flax seed
1 tsp baking soda
½ tsp salt
1 TBSP cinnamon (add 1 tsp each of nutmeg and ginger, and 1/2 tsp of cloves if using pumpkin)
2 ½ cups sugar free vanilla whey protein powder

Mix all ingredients in a bowl until well combined. Scoop a heaping ¼ measuring cup out onto a cookie sheet lined with parchment paper...3 will fit at a time. Bake at 350 degrees for 10-12 minutes. Cool, and then for easy transport (breakfast, snack, or pre/post workout on the go) wrap in zippered sandwich bags and refrigerate or freeze. One "muffin top" fits perfectly into a sandwich bag...perfect size serving! Really tasty and satisfying - ENJOY!

Nutrition information: Calories: 224 -- Fat: 5 grams -- Carbs: 32 grams (fiber 7 grams, sugar 9 grams) - Protein: 18 grams


Monday, November 8, 2010

Mixed Mushroom Pizza


This week's recipe is done at the request of my dear friend Cimberly Lewis, who also happens to be my oldest son's other mother. I was able to send this home with Brendan to share with the rest of his family, and they all gave it a "thumbs up". So, if you are a mushroom lover - ESPECIALLY if you are a mushroom lover, and if you love cheese or pizza in general, you should definitely give this recipe a try!


Pizza crust (recipe came from the bag of flour...Fred Meyer brand):
2 ¼ tsp active dry yeast (equal to one packet)
¾ cup warm water
2 TBSP olive oil
1 TBSP honey
1 tsp sea salt
2 cups all purpose flour

Dissolve yeast in warm water. Add remaining ingredients and mix until a ball forms. Dust lightly with flour, and cover with a damp cloth. Let rise until double, or 45 minutes. Punch down dough. Knead gently, and then roll to the thickness you prefer. Prick with a fork to ensure no bubbles as pizza cooks.

Mushroom Sauce:
6 TBSP olive oil
3 cloves minced garlic
1 tsp dried basil
1 tsp dried rosemary
¼ cup red wine
1 lb. variety of mushrooms, I used shitake, baby bella, and white button mushrooms
Salt and pepper, to taste
6 oz butter (truffle butter if you can make it!)
3 TBSP flour

Heat oil over medium/medium-high heat and then add minced garlic. Add rosemary, basil, and wine, and then simmer for 15 minutes or so. Add mushrooms, salt and pepper. Cook until mushrooms reduce in size and are tender, about 5-8 minutes. Add butter and flour, and mix well. Remove from heat. Spread over prepared pizza dough.

8 oz gruyere cheese
8 oz parmesan cheese
4 oz fontina cheese

Grate the above cheeses, or whatever cheese you prefer. Mix and sprinkle the amount you prefer over the mushroom sauce. I used about ½ the amount I grated. Use more if you like it cheesy! Bake at 450 degrees (F) for 12-18 minutes. And trust me...you'll ENJOY this treat!


Monday, November 1, 2010

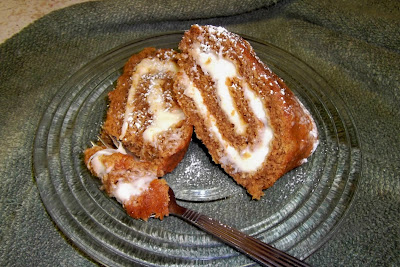
Pumpkin Roll with Cream Cheese Filling


The recipe/episode this week was requested by another girl I went to school with, Sara Murphy Bristol. And again, it is something I have never made before, but I can see why she wanted me to make it for BellinieBits. Not only is it delicious, and Thanksgiving is right around the corner, but it might be easier for someone to attempt to make this themselves if - rather that just READING a recipe and seeing pictures -- they can see it being made...mistakes and all! So once again, I used my trusty "Better Homes and Gardens" red and white checkered cookbook, circa 1989 for the recipe today. It was very good, but already, the gears in my mind are turning and noting the tweaks I will execute next time I make it! But here it is, and if you're craving something sweet, and slightly off the beaten path for typical holiday fare...give this a try!


Pumpkin Roll with Cream Cheese Filling

½ cup flour
1 tsp baking powder
2 tsp cinnamon
½ tsp cloves
½ tsp ginger
½ tsp nutmeg
½ tsp salt
4 egg yolks
1 tsp vanilla
1/2 cup sugar
4 egg whites
½ cup sugar
½ cup canned pumpkin
Powdered sugar

Mix flour, baking powder, salt, and spices in a bowl. Set aside.

In a medium bowl, beat egg yolks and vanilla with an electric mixer for 5 minutes, or until thick and lemon colored. Gradually add ½ cup sugar and continue beating until sugar is nearly dissolved. Stir in pumpkin. Wash beaters thoroughly.

In another bowl, beat egg whites with electric mixer until soft peaks form. Gradually add ½ cup sugar, and beat until stiff peaks form. Fold yolk/pumpkin mixture into egg whites. Sprinkle flour mixture over egg mixture, and fold in gently, just until combined.

Spread batter evenly over a greased and floured 15x10x1" pan and bake at 375 degrees for 12-15 minutes, or until cake springs back when lightly touched near the center.

Immediately loosen the edges of cake from pan, and turn cake out onto a towel sprinkled with powdered sugar. Roll up towel and cake together, jelly roll style. Cool on a rack. Unroll when ready to fill.

Cream Cheese Filling:

6 oz cream cheese
½ cup margarine
2 tsp vanilla extract
4 ½ cups powdered sugar, sifted
Dash salt

Beat cream cheese and margarine together with vanilla until fluffy. Add half of the powdered sugar, mixing until smooth. Beat in enough of the remaining sugar to make filling a thick spreading consistency. After unrolling cake portion, spread an even layer of the cream cheese filling (about ¼ - ½ inch thick) and re-roll cake. Sprinkle with powdered sugar and refrigerate until ready to serve. ENJOY!


Sunday, October 24, 2010

Norwegian Meat Cakes with Roasted Root Vegetables


This week, I would like to thank a lovely young lady from Norway that I've had a pleasure getting to know. Tone Marie Berg sent me this recipe to try, and in doing so, I am able to share some classic foods from a different culture with you. This was a very comforting dish to eat, and though it is typically served with boiled potatoes, carrots, and broccoli, I did my own thing as usual. The directions follow after the recipe in case you are a novice at roasting. In any case, I think you will thoroughly enjoy this as much as I did, and I really hope you give it a try!

NORWEGIAN meatcakes in brown sauce:

Meatcakes:

1 lb. ground beef
1 tbsp. potato flour (all purpose will do in a pinch though)
2 teaspoons salt
½ teaspoon pepper
7 oz milk
1 egg
½ onion
½ teaspoon nutmeg
¼ teaspoon allspice
butter

Mix ground beef with potato flour, salt, pepper and milk. Add the egg and stir well. Finely chop onions and mash it into the dough. Season to taste with the spices, and add more salt and pepper if desired. Brown butter in frying pan and shape meat cakes with a tablespoon I made them the size of mini-burgers, or sliders) and fry them until nicely browned. Finish cooking meat cakes in the sauce.

Brown sauce:

2 tablespoons butter
3 tablespoons flour
2 ¼ cup boiling dark broth (beef broth does fine)
salt
pepper
a little cream (I used about 1 -- 2 TBSP)

Brown butter in a saucepan, stir in the flour and mix well. Stir the entire time! Browning does not take long, so pay attention or it will taste burnt! Remove the pan from the heat and add broth. Put the pan back on the heat and bring to a boil while stirring. Add cream, and salt and pepper to taste. Let the sauce simmer for 8 to 10 minutes. Add the meat cakes the sauce and continue to let it simmer on low heat until meat cakes are cooked.

Serve with boiled potatoes, carrots and broccoli as is standard in Norway...OR, do what I did. I roasted mine!

Roasted Root Vegetables:

Preheat oven to 475 degrees

4 medium carrots
2 large russet potatoes
1 medium onion (you know I love Sweet Vidalia, but use whatever you please!)
1-2 TBSP olive oil
2 tsp dried rosemary
1 tbsp dried minced garlic
Sea salt to taste

Cut all the vegetables into large chunk size pieces. Place in a large bowl and drizzle with the olive oil, and add the garlic and rosemary. Mix well with your hands to coat all the pieces. Place in a cookie sheet lined with non-stick foil (LOVE you Reynolds Wrap for making this!!) and then salt to taste with sea salt. Add pepper if you like as well. Roast at 475 degrees for 20-25 minutes, stirring at least twice during this time. If you prefer your vegetable with more or less "char" adjust this time to your individual taste.

The gravy for the meatcakes tastes very nice on the vegetables too, but there are no rules here. New comfort food by any means, and I will be making this often over the years to come. Thanks again Tone for sending me this yummy recipe to share! ENJOY!

Sunday, October 17, 2010

Baked Acorn Squash with Savory Sausage Stuffing


Baked Acorn Squash with Savory Sausage Stuffing:
Serves 4

The idea for this recipe came from a viewer request…20 years ago when I was in junior high; I had a friend by the name of Michelle Fahr. She has since been married and has two beautiful children, so it was because of this old friend of mine, now Michelle Berry, that I am showing you how to make stuffed acorn squash today. I didn’t have a stuffing recipe to follow, so I just winged it on this one, but was incredibly delighted with the result. But feel free to get creative with your own stuffing, playing with the flavors and ingredients YOU like. Or, make what I did! It was VERY delicious!

2 medium acorn squash, halved and de-seeded

Line a 13x10-inch baking pan with foil; lightly grease the foil or spray with nonstick olive oil or cooking spray. Heat oven to 350°.
Cut squash in half lengthwise and scoop out seeds. Spray cut sides with olive oil spray or nonstick cooking spray and place, cut side down, on the foil. Add about 1/2 inch of water to the pan then cover with foil. Bake for 45 to 55 minutes, or until tender.
Stuffing:
1 lb Italian sausage
4 pieces of dry bread, crumbed
1 TBSP olive oil
½ cup chopped mushrooms
½ diced bell pepper
½ diced onion
1 clove garlic, diced
1 tsp basil
½ cup tomato sauce (or spaghetti sauce if you prefer)
Salt and pepper to taste
Freshly grated parmesan and mozzarella cheese

In a large sauté pan, cook sausage until no longer pink. Add olive oil to sauté pan, along with mushrooms, peppers, onions, garlic, and basil. Cook until tender. Remove from heat, and add bread crumbs, tomato sauce, and salt and pepper. Mix thoroughly.
Stuff squash with sausage mixture and put back on the baking pan. Bake for about 20 to 25 minutes, until hot. Add cheese and continue baking for a few minutes longer or until cheese is melted. ENJOY, I know you will!!


Sunday, October 10, 2010

Shrimp Ravioli ala Sydney


Ravioli ala Sydney

So my niece Sydney (honorary, of course) had a request for my show. And far be it from me to deny her! She is, after all, the daughter of one of my very best friends in the whole world! My only stipulation in the agreement was that she had to help me with the show, and be my very special taste tester! I did make sure the recipe was up to her standards as well, making sure there was nothing weird or too green involved. First of all, I found it impossible to locate any fresh pasta sheets locally. So as a last resort, I decided I’d take the plunge and make my own pasta, from scratch. If you have ever made a pie crust, you can make pasta, it’s NOT very difficult! And the filling was a collaboration between Sydney and I…she wanted seafood, and I decided the details. This is what we came up with, and it was very, VERY tasty!

Homemade Pasta:
3 cups all purpose flour
5 egg yolks
½ tsp salt
½ cup water, give or take a bit…

Mix flour and salt in a mixing bowl. Beat the egg yolks and water in a small bowl separately and then add to the flour mixture. Mix dough with your hands. If the dough is too dry, add more water (1 tablespoon at a time) and if the dough is too wet, add flour (1 tablespoon at a time). Once you have developed a nice firm but sticky dough – continue to knead for about 10 minutes. Then, to let the proteins relax a bit to make rolling easier, let dough sit (covered) for about 20 minutes.
Divide dough into 5 equal pieces. On a floured board, roll out each piece with a rolling pin, using flour to prevent sticking, and flipping until you have reached a thin enough dough to see your hand through. Lay each sheet on top of parchment paper, and stack as you complete each new sheet. If you are not going to use dough right away, you can refrigerate for up to 2 days, or freeze for up to one month. Roll dough up in parchment paper and cover well in plastic prior to storing. If you plan on using it immediately, cut the dough into squares or circles with a glass or pasty cutout. Fill pieces with your choice of filling and wet edges with a little water before sealing with a fork. Once filled, you can freeze on a cookie sheet until firm before transferring to container, or you can boil right away. Boiling fresh takes about 5-7 minutes, and from frozen can take up to 10 minutes.

Shrimp filling:
1 lb bag pre-cooked shrimp, peeled and tail removed
1 bunch flat leaf parsley (about 1 ½ cups loose packed)
3 cloves garlic (or 1 TBSP jarred minced garlic)
1 TBSP lemon zest (from 3 small lemons)
Olive oil…between ¼ and ½ cup
¼ tsp salt

Place half of the shrimp, and the remaining ingredients in a food processor and process until you have a paste. Rough chop the other half of the shrimp with a knife, and mix that in with the paste mixture. This will give a lovely texture inside the ravioli. Use about a tablespoon of mixture to fill each ravioli depending on the size you make. I made large ravioli and a tablespoon was perfect. Adjust accordingly. Either fold the pasta over the filling and wet with a dab of water and crimp with fork, or put a piece if pasta over the top if making larger ravioli like I did. Either way, make sure you are securely sealed around the edges before cooking.

Alfredo Sauce:
5 TBSP butter (or margarine)
2 cloves garlic, minced (about 2 tsp)
2 cups half and half (or heavy cream if you prefer!)
¼ tsp pepper
½ cup freshly grated parmesan
¾ cup grated mozzarella (gruyere or swiss would be lovely too!)

Melt butter in medium saucepan over medium/low heat. Add the garlic, cream, and pepper and bring mixture to a simmer. Stir often. Add the Parmesan cheese and simmer sauce for 8-10 minutes or until sauce has thickened and is smooth. When sauce has thickened, add the mozzarella cheese and stir until smooth, (don’t freak out if it seems too thick or stringy…it will smooth out!). STIR FREQUENTLY. While the sauce cooks, boil ravioli for 5-7 minutes. Place ravioli on serving plates and spoon sauce over pasta. And then, ENJOY!!!


Sunday, October 3, 2010

Nutty Chick


Nutty Chick

I have been making ‘viewer requested recipes’ in the past weeks, but this week is different. After watching some of my cooking videos, my friend Misty Hamilton told me I had inspired her to take some time out of her ultra busy schedule to cook more. BRAVO Misty!! I know how busy you are, so I am impressed! At any rate, she told me about a recipe she threw together one night off the top of her head, and how much her family loved it. So I requested the recipe to make for BellinieBits! Now I forgot one of the ingredients while I was filming and had to go back and fix it, but maybe you’ll have better luck getting it all right the first time! Here’s the recipe:

Preheat oven to 350 degrees.

4 boneless, skinless chicken breasts (create a pocket in each one)
1 cup peanut butter (I used chunky for texture)
1/8 cup honey (or more to taste)
1 tsp ground cumin
½ tsp ground black pepper
4 chicken bouillon cubes, mashed
¼ cup honey mustard

Mix the last 6 ingredients (all but the chicken) together in a bowl. If it is too stiff to mix, heat up the microwave for 20-30 seconds to soften. Inside each pocket of the chicken breast, spoon a heaping tablespoon of the mixture in. On the top of the chicken, add a little more, and then drizzle with extra honey. Once all 4 breasts are dressed, loosely wrap the chicken in some foil, and place on a cookie sheet. Bake at 350 degrees for about 40 minutes. The chicken will be fork tender and juicy. Serve with a side of cold sesame noodles, or ramen noodles and assorted vegetables for a nice and easy dinner. Thanks Misty! This is a dish you are sure to ENJOY!

Sunday, September 26, 2010

Chili Rellenos - The Ultimate Cheesy Comfort Food!


Chili Rellenos


So, this is one if the ultimate "comfort foods" in my book. Although it has been well over a decade since I've last eaten the stuff...and I couldn't even tell you why that is. So imagine my pleasure when a relative suggested I make it for BellinieBits?? I was happy to comply with the request, and being that it was also my first attempt at making it, it was a learning experience I got to share with you! I love to try new things just for those who watch, so that you know that NOTHING is a cause for fear. Everything is, and can be, easier than it looks! So, I'd like to offer a HUGE thank you to Charles Wetlaufer for sending me the recipe. Here it is:

Chili Rellenos Casserole
28 oz can green chilis, whole or diced
16 oz Colby jack cheese
8 oz pepper jack cheese
8 oz mozzarella cheese
1 TBSP olive oil (or vegetable oil if you don't have any)
2 cloves garlic, minced (or 1 TBSP jarred minced garlic)
½ large onion, diced
4 eggs
1 cup flour
1 1/3 cups milk
½ tsp salt (optional)
2 ½ cups shredded chicken or beef (optional...use if making a main dish)

Make sure you preheat your oven to 400 degrees before you're ready to bake this. Grease a 9 x 13" casserole dish too.

In a large bowl, combine all the cheeses and mix thoroughly. Set aside.

In a medium sauté pan, heat the olive oil on medium high, and sauté the onion and garlic just until tender and translucent. Set aside to cool.

In a medium bowl, add flour, salt, eggs, and milk. Whisk until smooth and resembles runny pancake batter. Set this aside also.

Drain the chili's and cut into strips or dice (whichever is your preference) if they are whole. Make sure you also remove the skin (while they are still whole) if they haven't been removed already. Mix the chilis with the sautéed onion and garlic. Layer about 1/3 of the chili mixture in the bottom of the casserole dish. Add a layer of cheese in top of that. If you are adding shredded meat, add a layer now. Then start over again with the chili mixture, cheese, meat, so on, until everything has been used. Now you can evenly pour the batter over the entire dish, trying to make sure you evenly distribute everything. If you want to prevent over browning, cover dish with a piece of foil. Bake at 400 degrees for 20 minutes. Then drop the temperature to 350 degrees, and bake for another hour. At this point, I took the casserole out of the oven to cool, but in Charles' recipe, he indicated you could turn the oven off and let it stay in for another half of an hour and it will be fluffy and settle a bit. It will resemble a quiche. Add whatever toppings suit you (I like sour cream and diced tomatoes, but I'll bet avocado would be nice too) and ENJOY!


Sunday, September 19, 2010

Cupcakes!


Carrot & Apple Cupcakes!

This episode and recipe comes out of the blue today because my friend, Shalon Whitgob, is throwing herself a “pre-surgery” cupcake party! And since she is too far away for me to actually participate, I am honoring her with this extra special episode of BellinieBits! And really, who doesn’t just love a cute little cupcake to indulge in every now and then? Now my dilemma with the whole cupcake thing is this…what constitutes a cupcake as opposed to a muffin? They are shaped the same, taste the same, minus frosting and decorations…so is that the only difference? Frosting? Well, not knowing the proper answer to this question of mine, I decided to make one of my favorite muffin recipes and turn it into a cupcake. So here you go – I hope my ignorance on this subject doesn’t offend anyone!

Cupcake/Muffin:

Wet ingredients –
1 grated apple, skin and all
2 grated carrots, approximately 2 cups
¼ cup vegetable oil
½ cup molasses
½ cup lightly packed brown sugar
3 eggs

~~~Mix all the wet ingredients well in a medium bowl, then add:

Dry ingredients –
1 ¼ cups flour
¾ cup old fashioned oats
¼ cup ground flax (optional)
2 tsp baking powder
½ tsp baking soda
¼ tsp salt
2 tsp cinnamon
½ cup chopped walnuts (optional)

~~~Mix until well incorporated. Preheat oven to 350 degrees, and grease 12 muffin tins, or use cupcake liners. Using 1/3 cup measure, evenly distribute the batter to each of the 12 muffin tins. Bake for 20 minutes, or until toothpick comes out clean. Let cool before frosting.

Maple Cream Cheese Frosting:

4 oz cream cheese
2 oz butter (1/2 stick)
¾ pound powdered sugar
½ tsp maple extract
¼ tsp salt
Milk to thin, if needed

~~~Cream together cream cheese and butter until smooth. Add salt. Blend in about 1 cup of powdered sugar at a time. After 3rd cup has been added, add maple extract and mix well. Add more sugar if you need to stiffen the frosting more. If frosting is too thick, add 1 tsp of milk at a time until it reaches proper consistency. Frost each cupcake with about 1 Tablespoon of the icing.

Candied Carrots:
In a medium sauce pan, bring to boil 1 cup of water and 2 cups of sugar. Add 2 cups of grated carrots to syrup mixture, and then let simmer for 1 hour. Drain carrots with a fine sieve, and then spread out on a cookie sheet lined with non-stick foil. Set oven to 275 degrees, and let dry for a few hours, until hardened. Crumble to the size you want for sprinkling over cupcakes.

And do me an extra special favor too, and go visit Shalon's page and take a peek at her journey, and learn why she is such a special lady, and why she's imprinted on my heart forever:
Alcohol....it's the new glue!

You are now ready to share this treat and ENJOY!


Sunday, September 12, 2010

Fruit Salad with Whiskey Sauce and French Toast Croutons


Fruit Salad with Whiskey Dressing and French Toast Croutons

I was asked by my friend Jennifer Doman to make something different with peaches, since they are in season right now. Now, I could have gone the traditional route, and made a pie, tart, or cobbler…but I decided to do something else fairly traditional, yet give it my own “BellinieBits” twist! So here you go Jennifer, and everyone else – I certainly hope you’ll try this recipe! Easy, fresh, and wickedly delicious!

Fruit Salad:
2 or 3 large ripe peaches, thinly sliced
1 or 2 bananas, sliced
1 or 2 cups fresh raspberries
~~~Now, you can certainly use any other fruit with this salad, I chose the above because I love them all individually and also because I liked the variety of color. Blueberries, pears, grapefruit, kiwi, grapes, strawberries, and plums…all would work as well. Heck, you might even throw in some apples and oranges if you like too! Just use what YOU like!

Whiskey Sauce:
1 stick (1/2 cup) butter
1 cup white granulated sugar
2 egg yolks
2 TBSP water
¼ - ½ cup whiskey (use as more if you like a stronger flavor)
~~~Melt butter over medium heat in a small saucepan. Add sugar, egg yolks, and water. Stir to combine, and then cook over medium heat for 5-6 minutes, stirring frequently until sugar dissolves and mixture is bubbly. Remove from heat, and add whiskey. Mix well, and then cool before using.  You can store the sauce in the refrigerator for up to 3 weeks. This sauce can be thinned out in the microwave for about 30 seconds if you’ve refrigerated it. It goes wonderfully over a variety of dishes like French toast, ice cream, pies, cheesecakes, fruit crisp, cobblers…once you taste it, you’ll want to use it on everything!

French Toast Croutons:
Perfect use for left over French toast! But here’s how I made it, if you’re wondering-
2 eggs
½ cup milk
1 tsp vanilla extract
1/3 cup sugar
Dash salt
1 tsp cinnamon
6 pieces of bread
~~~Mix first six ingredients together in a small bowl. Dip bread one slice at a time into egg mixture, and make sure both sides soak in a little of the mix. Cook until browned on a greased skillet, then flip and brown on the other side. After all pieces are browned, cut into small crouton sized squares. Lay pieces on cookie sheet in a single layer and let dry out in a 250 degree oven until crunchy - about 1 or 2 hours, but check and stir every 20 minutes or so, as all ovens cook slightly differently.

Now it’s time to assemble the salad! In a large bowl, add all sliced fruit, and any other berries you are using. Spoon about ½ cup of the whiskey sauce over fruit and gently mix to coat all fruit evenly. Dish up servings into individual bowls and top with French toast croutons. Drizzle more whiskey sauce over each serving if desired. And by all means….ENJOY!

Sunday, September 5, 2010

Island Sandwich


Island Sandwich (for Kami!)
Serves 8

First off, I want to thank those who put in requests...I am only too happy to give ideas on meals! So today, I took my friend Kami Sussman's suggestion to make a low fat and high fiber meal, which was both sweet and savory. I decided to take two different recipes that I have been using for a long time and marry them together in one sinful sandwich! The result is my own twist on a traditional "pulled pork BBQ sandwich", and might I add...I think it certainly holds its own! So here you go...the recipe for the "Island Sandwich" and all its components...

Tropical Whiskey Chicken:
In a 3 Qt. pan, add:
2 cups lightly packed brown sugar
½ cup soy sauce
½ cup pineapple juice
½ cup whiskey
(optional...add 1 TBSP minced garlic, and 1 tsp chili powder for extra flavor)
2 -- 2 ½ pounds boneless, skinless chicken (I used a blend of thighs and breast for best flavor)
~~~Add all ingredients to the pan, and then bring to boil. Once bubbling, let simmer for about 45 minutes. Remove from heat when meat is tender, and then shred with two forks. Continue to let remaining sauce reduce over medium heat for 10-15 minutes, or until is a syrupy consistency. Drizzle reduced sauce over chicken if extra flavor is desired.

Tropical Cole Slaw:
1 cup low fat mayonnaise
¾ cup pineapple juice
¼ cup fat free half and half
1 pkg. Ranch Dressing mix
12 oz bottle honey mustard
½ cup bacon pieces (6 sliced, cooked and diced if doing from scratch)
16 oz bag shredded cabbage mix
~~~Mix first 5 ingredients together until smooth for dressing. Mix 1/3 cup of dressing with the bacon and cabbage. Let coleslaw sit in refrigerator for 1 hour for best flavor. I personally use this dressing on salads and coleslaw, so the extra works well for me.

1 package Orowheat Sandwich Thins
8 pineapple rings

Toast sandwich thins and grill pineapple slices if desired. Assemble sandwiches with a generous helping of chicken, 1 pineapple slice, and about 1/3 cup coleslaw mix. Serve immediately and ENJOY!


Sunday, August 29, 2010

Hearty Apple Crisp with Maple Cream

Apple Crisp with Maple Cream

So, as I usually do, I take the end of week ingredients I have left in my refrigerator and pantry, and depending on what I have, I try to put together something tasty. This week, I had a few apples left in the fridge, some sour cream with no plans to use, and a few graham crackers left in an open package. I took the inspiration for this dessert from my favorite “go-to” breakfast. This certainly can be served as a breakfast too as it has the basic elements of a morning meal, but also works as a hearty dessert. Hope you give the recipe a try! It’s a bit of a twist on a traditional recipe…

Hearty Crisp:
 3 sheets Graham cracker, finely ground (about ½ cup crumbs)
1 cup old-fashioned rolled oats
¼ cup ground flax seed
1/3 cup brown sugar
1 tsp. cinnamon
½ tsp. salt
~mix well in a bowl, then add:
1 stick  (1/2 cup) butter or margarine
1 tsp. maple extract
1/3 cup roughly chopped almonds or walnuts (set aside for garnish before baking)
~blend with a pastry blender or fork until crumbly in texture. Set aside.

Apple base:
4 diced apples, skin on. I used Fuji Apples
1 TBSP lemon juice
3 TBSP sugar (white is fine)
2 ½ TBSP cornstarch (or 5 TBSP flour)
½ tsp. cinnamon
¼ tsp salt
~mix thoroughly, then spread in an even layer in a greased 8x8” square pan. Top with crisp mixture. I topped this all with 1/3 cup roughly chopped almonds, which is completely optional. Walnuts would have been equally delicious.  Bake at 375 degrees for 40 minutes, or until browned and bubbly.

Maple Cream:
1 cup light sour cream (or full fat if you don’t care)
¾ cup powdered sugar
Dash or two of salt
½ tsp. maple extract
~mix until smooth, and refrigerate until ready to use.

Serve warm crisp with a generous spoonful of maple cream, and above all…ENJOY!!

Sunday, August 22, 2010

Balsamic Glazed Chicken

BALSAMIC GLAZED CHICKEN

So my oldest son Brendan is totally awesome to have around because he likes to try different foods. Okay, he’s awesome for more than just that, but for my cooking habits, he totally ROCKS! He keeps me on my toes by asking me to make new things, which I am more than happy to do for him. So last summer, he had gone to dinner with his grandparents and came back saying I HAD to make balsamic glazed chicken for him. His description of this sweet, tangy, and sticky glaze did not match any recipes that I had been able to find. So I combined a few recipes from the internet, and tweaked it until I got the results he and I were both looking for. So here it is…

So, take your boneless, skinless chicken breasts, and pan fry them in a little bit of olive oil. I seasoned mine with a light sprinkling of salt, pepper, and rosemary. After you flip halfway through cooking (once you get a nice golden brown on the first side) I like to “steam cook” it the remainder of the way using a lid. While that is cooking….let’s make the glaze!

Balsamic Glaze (makes enough for 4-6 breasts):
¼ c. balsamic vinegar
2 TBSP soy sauce
1 TBSP honey
3 TBSP brown sugar
Zest from ½ lemon
1 TBSP minced garlic
1 tsp dried thyme
2 tsp dried rosemary
Bring all ingredients to a boil in a small saucepan, then reduce heat to simmer (make sure heat is hot enough to continue bubbling) for approximately 5 minutes, or until reaches a syrupy consistency.

During the last 5 minutes or so of cooking the chicken, drizzle about ¼ of the balsamic glaze over the chicken in the pan, and baste the pieces with the glaze. When the chicken is done, use remaining glaze to taste on top of chicken prior to serving.
Tim’s Garlic Bread (makes enough for 4-6 pieces):
1 TBSP margarine or butter
2 TBSP mayonnaise
1 tsp minced garlic
½ tsp rosemary
2 TBSP parmesan cheese
Mix ingredients together until well blended, and spread a somewhat thick layer on top of bread pieces. Broil in oven on cookie sheet until browned to your liking. If you prefer crispier toast, broil straight on rack. I served this dinner with steamed broccoli florets, but really, this glazed chicken will go with your favorite sides dishes in a pinch. ENJOY!!